
)
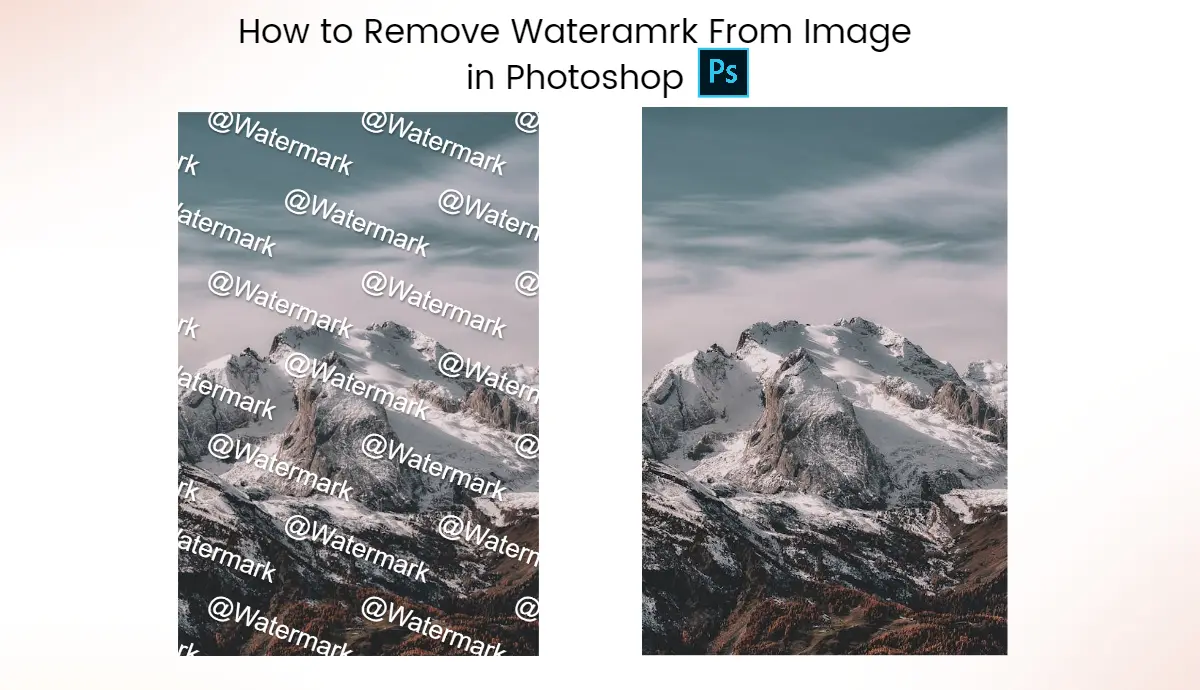
How to Remove Watermark From Image in Photoshop: Step-by-step Tutorial
Summary: In this article, we’ll teach you how to remove a watermark from an image in Photoshop. To avoid the hassle of complicated workflows, just check our guide for a quick solution.
Photoshop is a powerful toolkit that provides a wide range of photo editing features. It’s welcomed by professionals looking for advanced photo editing and retouching. It also offers basic photo editing tailored to the needs of novices, like cropping, resizing, adding text, etc.
Removing watermarks from images with Photoshop can be challenging, but take it easy. In this blog, we’ve compiled a comprehensive guide on how to use Photoshop to remove image watermarks. Follow every step and unleash the full potential of Photoshop magic.
6 Methods to Remove Watermarks From Photos in Photoshop
Here, we list six common ways to remove watermarks from images in Photoshop. They are:
● Spot Healing Brush Tool
● Clone Stamp Tool
● Remove Tool
● Content-Aware Fill
● Generative Fill
● Patch Tool
We’ll briefly introduce and present a step-by-step tutorial for each tool. Choose your ideal tool based on your preferences and needs. Now, let’s see how to use it.
1. Spot Healing Brush Tool
The spot-healing brush tool is ideal for removing small objects and imperfections. It works best for small-sized watermarks. To use this tool, simply navigate to the area you want to repair, adjust the brush size accordingly, and move the mouse over the target area.
This tool automatically matches and mixes the pixels around, which is highly efficient and effortless for any project.
Here’s how to remove the image watermark with this tool:
1. Select the spot healing brush tool from the left toolbar and adjust the brush size as needed.
2. Move the mouse over the watermark and gently click it. Seconds later, the watermark disappears.
3. If you find the watermark removal unnatural compared with surrounding areas, you can reduce the brush hardness for a soft effect.
2. Clone Stamp Tool
The clone stamp tool samples a part of an image and duplicates it to another area or areas of the same image. To sample, hold the Alt key and click the target area.
This tool is highly flexible, and you can resample at any time. Moreover, you can adjust the transparency of the options bar to achieve the best result.
Let’s see how to do it:
1. Continue with the previously uploaded image and select the clone stamp tool from the toolbar.
2. Hold the Alt key and click on a part of the image to duplicate from.
3. Once sampled, move the mouse over the watermark. Soon, the watermark is removed. It’s simple and fast.
3. Remove Tool
The remove tool is another useful tool to remove watermarks. It can eliminate unwanted objects and blemishes in the image. It’s pretty easy to use it:
1. Select the Remove Tool from the left toolbar.
2. Adjust the brush size and paint over the watermark.
3. This tool is used not only for removing watermarks but also for removing objects and people. Try it for diverse and specified needs.
4. Content-Aware Fill
There is no need to worry if the final result is not consistent with the surrounding areas. The content-area fill can intelligently detect the missing area and fill it seamlessly.
1. First, use the Rectangular Marquee Tool to make a selection around the watermark area.
2. Go to the “Edit” menu and select the “Content-Area Fill.”
3. Then, you can adjust the settings on the panel. The default settings generally work best, but you can also make adjustments based on your needs.
4. Once satisfied with the settings, click “OK”.
5. Generative Fill
However, the content-area fill can only be used for simple watermark removal. It does not perform well on complicated image details.
If you have an image with complicated details and scenes, the Generative Fill is a better choice. It can erase anything you don’t want from the image seamlessly and flawlessly. Check the step-by-step tutorial:
1. If you use this Tool for the first time, it will process for a longer time.
2. Open the image by dragging and dropping it to the canvas.
3. use the color range or lasso tool to select the watermark.
4. Go to Window and navigate to Contextual Task Bar.
5. Then, you’ll have a Generative Fill button. Click it, leave it blank, and generate.
6. Wait a second. After generation, there are three options. Choose the desired output from these options.
6. Patch Tool
The patch tool is ideal for removing image watermarks. It allows you to replace the target area of an image.
Here’s how to get the work done:
1. Select the Patch tool from the toolbar on the left side.
2. Select the watermark using the Patch tool. Ensure your selection contains the overall watermark area.
3. Click and hold the left mouse button within the selected area. Drag the selection to the clean and similar area in the image as the replacement area of the watermark.
4. Place the selection over the area that matches the surrounding pixels to ensure a seamless blend.
5. Release the mouse button once you’re satisfied with the selected area. Then, Photoshop replaces the selected watermark with the pixels of the chosen replacement area.
Best Free Image Watermark Remover: Simplify Your Workflow
Photoshop provides an array of tools to remove watermarks from photos. However, it takes a lot of time. You need to manually select the watermark, adjust settings and opacity, and redo the selection if it doesn’t cover the complete watermark.
AI Ease has launched a free image watermark remover to speed up your work process.
Powered by artificial intelligence, it accurately analyzes images and generates watermark-free images in seconds only.

Key Features:
• 100% Free-of-Charge
• AI automatic removal supported
• Remove watermarks in bulk
• Online-based, no installation required
• No registration needed
• Ensure impeccable and realistic results
• Unlimited generation
• Save time & cost
How Can I Remove Watermarks From Images with AI Ease?
1. Go to our site: https://www.aiease.ai/ and choose the AI image watermark remover.
2. Upload the photo you want to remove from your folders, or you can drag and drop the image into the canvas.
3. Choose the “Auto” mode to remove the watermark automatically. Or select the “Manual” mode and use the brush tool to paint over the watermark. Also, you can use the “Rectangle” tool to make a quick selection.
4. Employ the “Erase” tool to erase the extra elements for a perfect selection. Next, click “Remove” to see the AI wizardry.
5. Wait a moment, and click the “Eyes” icon to preview the final result.
6. Click the “Download” button to download the current image to your device.
Wrap It Up
It’s illegal to remove watermarks from images without the owner’s authorization. But if you want to edit the watermarked image for other purposes, there are many options available.
Pick Photoshop, as it’s a powerful and authoritative photo editor. But if you don’t want premium editing features, it’s recommended that you use a free image watermark remover, like AI Ease. I hope you find this helpful!